

Contactless throttle position sensor 34370022 for VW, Audi, Peugeot,Fiat, Citroen, Lancia
$80.00
Once you will install this TPS on your vehicle, you will get:
-Increased reliability of throttle
-Stable idle speed
-Accurately and precisely throttle response
-Fuel economy
Also you will forever forget about Bosch’s and chinese copy sensor’s track wear, because our sensor doesen’t have any wearing parts.
- Description
- Complete Installation Manual
- Instructions Archive
- Technical Characteristics
- FAQ
- Discussions(31)
Description
Hello folks !
I have designed this kit to replace 4-pin( manual transaxle) and 7-pin( automatic transaxle)
Throttle Position Sensors


- Bosch 3437022
- Bosch 3 437 022
- Bosch 3 437 022 512
- Bosch 3 437 022 900
- And their analogues
which was factory installed on Mono Motronic and Mono Jetronic systems on 1980-199X VW, AUDI, Fiat, Citroen, Peugeot, Lancia etc.
And this contactless TPS does not deteriorate like Bosh’s TPS
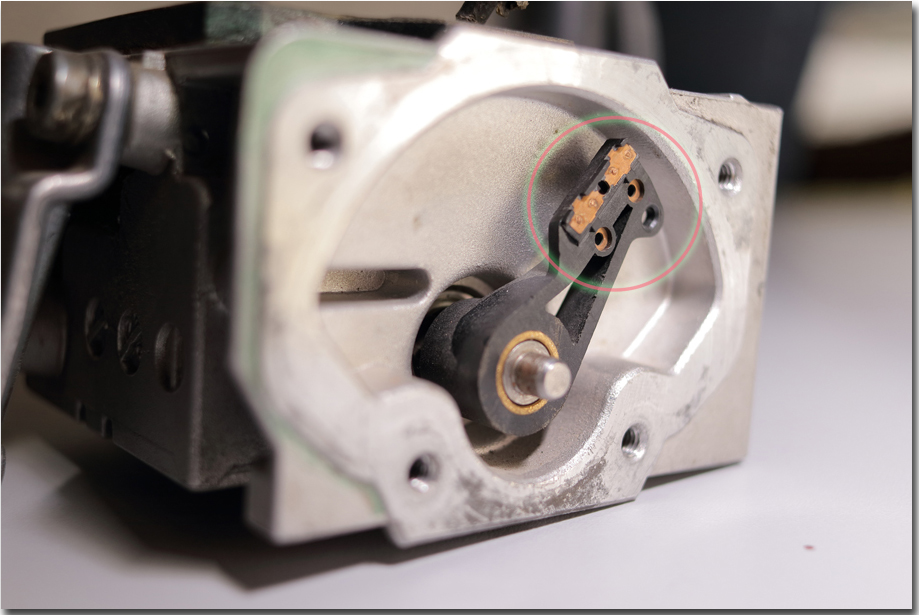
Here you can see Bosh’s TPS track deterioration over the years

Also this contactless TPS will perfectly works on a throttle with a damaged or broken brushes like this
Ohh! Man, are you kidding me?
How it could be possible and how it could work without contact-brushes?
This was a first questions of one of mine friend , when he saw my new TPS at first time.
No, i am not kidding! 🙂
Contactless sensor is real, all we need is to install bushing with magnet on throttle spindle.

The principle of operation of this TPS Converter is based on measuring the angular position of the magnetic field of the magnet which is mounted on the throttle shaft.
Onboard Hall sensor measures the rotation of the magnetic field (and accordingly the rotation of the throttle axis) in space in degrees and transmits this value to the MCU which converts the measured value of the throttle angle into an electrical signals.
The characteristics of this signals are absolutely identical to the signals of the Bosch sensor 3 437 022.
It has onboard protection from overvoltage, reverse polarity and short circuits.
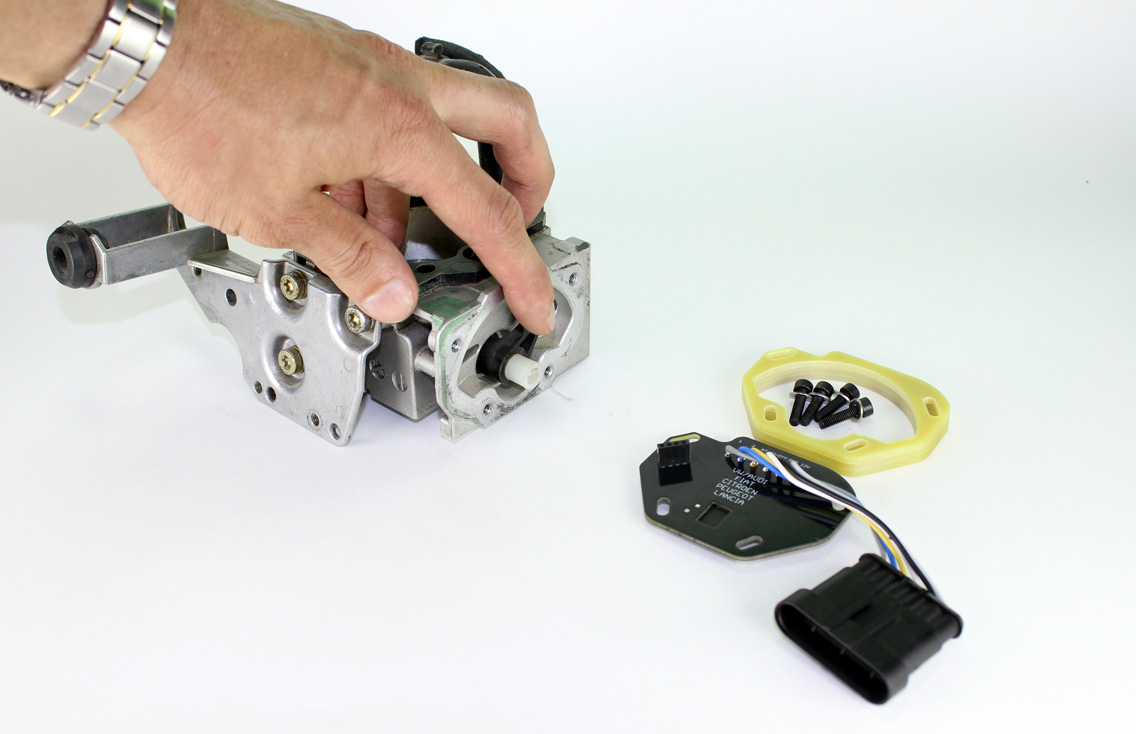
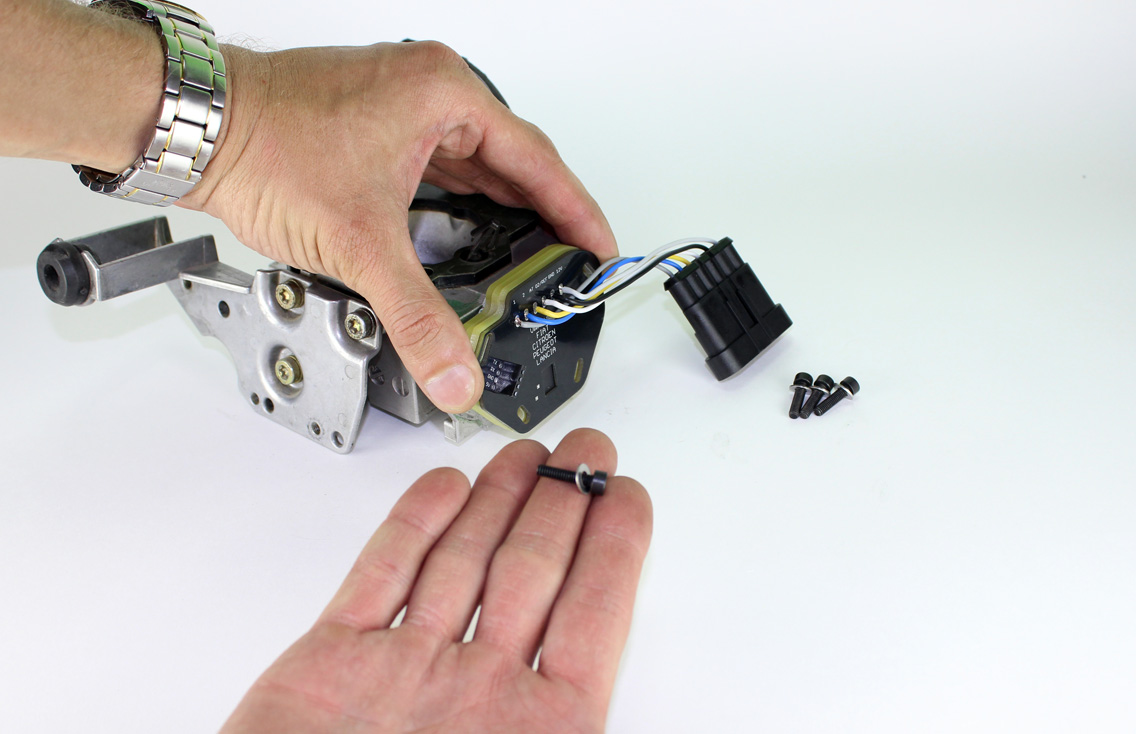
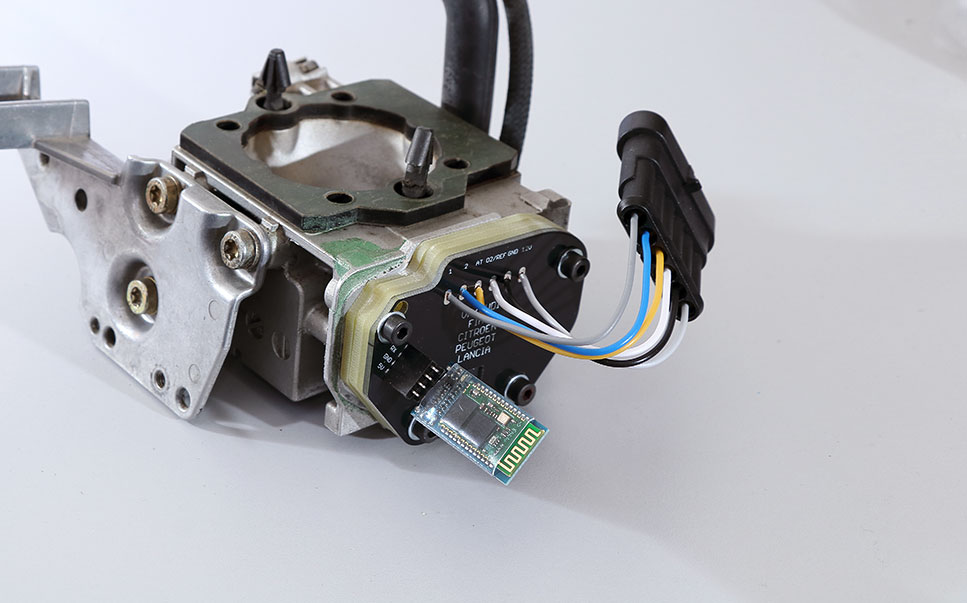
There are no difficulties with installation and everything is quite simple.
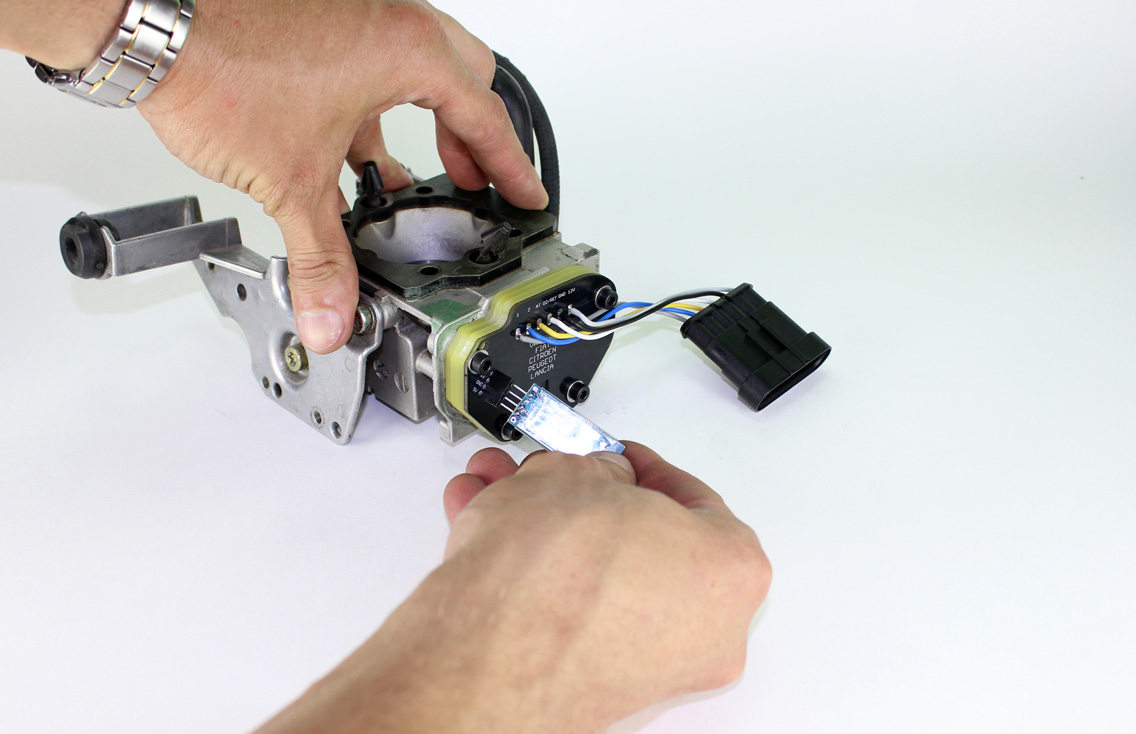
Here is an example of installation on bottom part of MonoMotronic injection unit


How can i tune it?
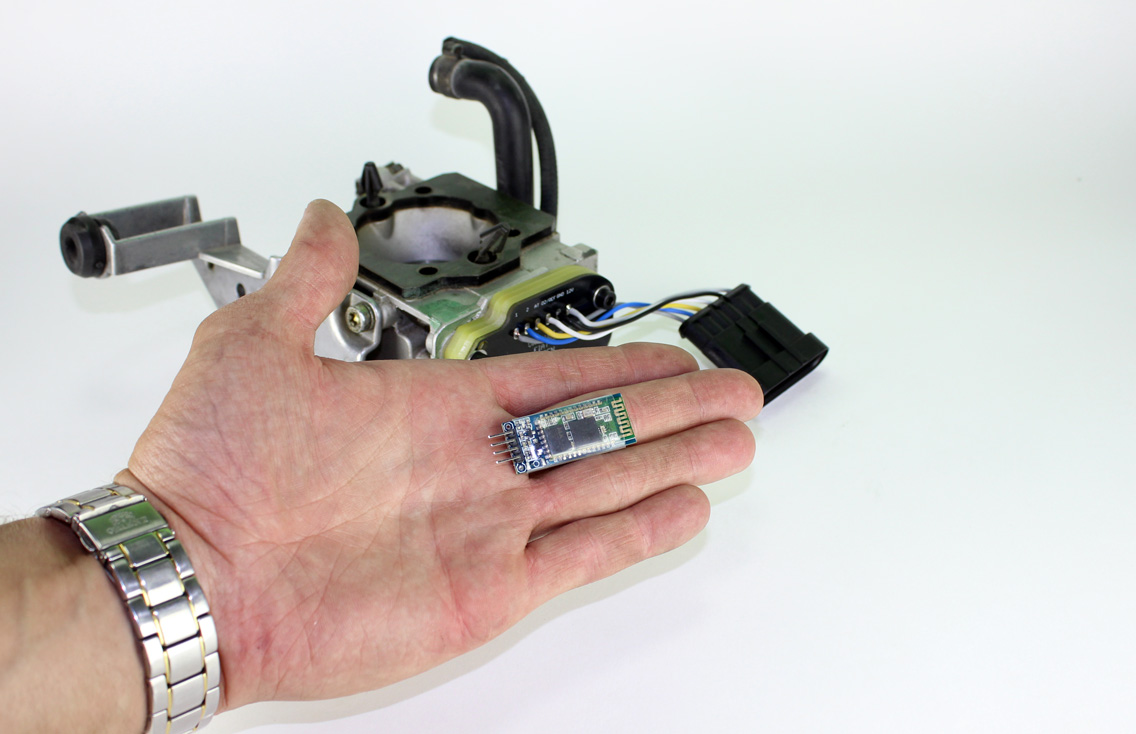
You can use bluetooth module to calibrate, tune and diagnose it with a special software
(for more details look at “Complete Installation Manual” tab above)
The main problem of tuning genuine Bosh or chinese TPS is to tune it properly
You culdn’t rotate it by hands precisely.
For our sensor it’s not a problem at all- with a new software you can tune this TPS precisely and you dont need to rotate it by hands physically.
This will allow you to get the best traction and economy ratio for your engine,
which is not available with conventional resistive sensors (even if original or Chinese analogs).

Just press calibration button to setup initial position and adjust Alpha to virtualy rotate TPS.
You can virtualy rotate it in resolution of 0.1 of degrees, you culdn’t achieve this resolution if you will rotate TPS by your hands.
Be carefull while ordering the sensor on Peugeot 205 1.4 it’s throttle axis could also be 5 mm instead of 8 mm

So before place an order it would be better to remove the genuine sensor and check axis diameter.
Order contactless 3437022 TPS right now and forget about the tracks wear forever.
If you have any additional questions, doubts or suggestions please write a comment in the “discussion” tab above.
P.S. Also we can develop similar contactless sensors for other brands of cars and motorcycles.
Proposals on this issue should be sent to the support team ( see e-mail at the bottom of “How to order” page).
Some video tutorials ( for more please visit youtube channel)
Complete Installation Manual
New firmware and software V1.7 for sensor manufactured after 08.04.2024 download link
For sensors manufactured before 08/04/2024 please use old software versions form Archive tab above.
Important information:
For sensors purchased before 08/04/2024, I do not recommend updating the firmware of a sensor you just got from post office. Configure it with the firmware it came with, make sure that everything works correctly and only then proceed with the update.
For sensors manufactured between 13/06/2022 and 12/12/2024 use 16MHz firmware.
Please read these notes before upgrading:
https://pilotengineering.ru/bez-rubriki/obnovlenie-proshivka-v1-7-dlya-datchikov-3437022/
https://pilotengineering.ru/bez-rubriki/zagruzchik-proshivok/In the firmware versions 1.6, 1.7 and newer, the sleep mode in sensors is disabled. Therefore the sensor cannot be powered directly from the battery! Although this option of power supply is shown in the videos below, it worked only in older firmware. For power supply use only the ignition coil power wire or other circuit powered from the ignition switch, where power appears and disappears with the turn of the ingition switch.
I would also like to draw your attention to the fact that the video below and on my youtube channel provides information on installing and configuring sensors with older firmware. Although the general principles in the new firmware and software have not changed much and correspond to what is shown in the videos, there are still some subtleties and differences, which are described below in the text (which I constantly update with the release of new firmware). So I strongly recommend not to be lazy and read it.
Here is a simplified video tutorial about installation of this sensor
Text version of the instructions:
So you have purchased the sensor and are ready to install it.
First we will describe the process of installing and configuring the sensor manually (without using Bluetooth), and then we will consider installing and configuring the sensor using Bluetooth and special software.
And we will start with the sensor pinout
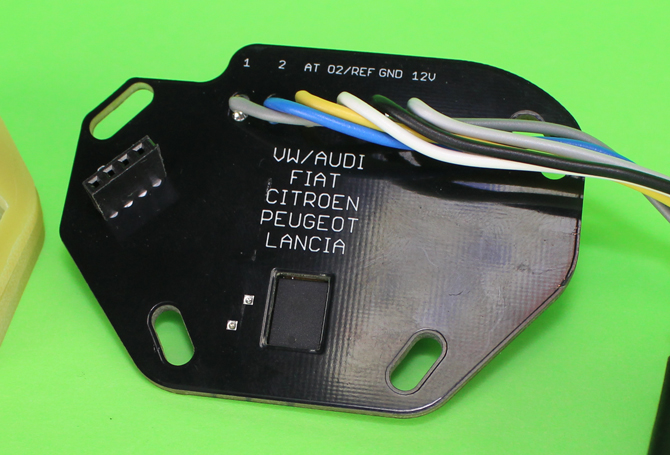
Here is a pinout :
1– Output signal as track #1 on genuine TPS
2– Output signal as track #2 on genuine TPS
AT-Output signal for automatic transaxle ECU
O2/REF – Input signal of reference voltage 5V or oxygen sensor signal ( for test )
GND – ground
12V – supply voltage
Ok. Now lets look at the connection diagrams
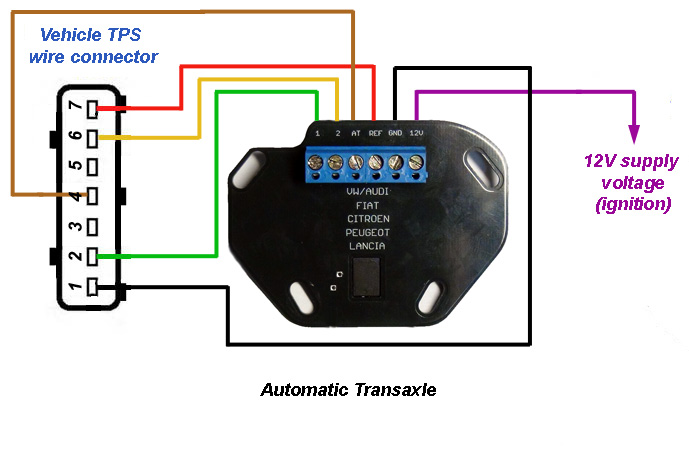
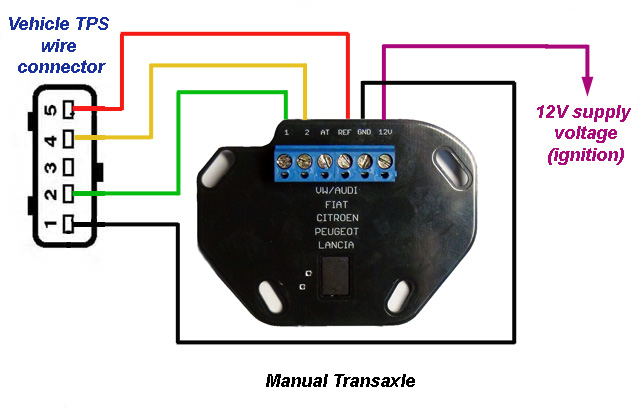
For sensors manufactured after 08/04/2024 you don’t need to connect red wire” Ref” to the genuine connector. You can use “Ref” input for monitoring oxygen sensor signal, or don’t connect it at all.
On the schematic above you can see TPS with blue wago type connector, dont worry about it – it was on previous version. But for clear connection view this picture will be the best, because pinout is same .
Attention!!!
The diagrams show the pinout of the socket with wiring (not the part that protrudes from the genuine TPS), as if you look at it from the side of the contact holes!
Depending on transaxle type , there culd be two differet TPS connectors and corresponding connection diagrams( see pic above).
To find numeration of pins of genuine connector all you need is to turn inginion on and find reference voltage(5v) with a multimeter.
Nothing difficult.
If you have questions – feel free to ask in discussion tab.
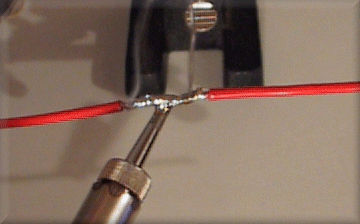
To connect new connector to vehicle wiring you can use:
-Butt connecor like this
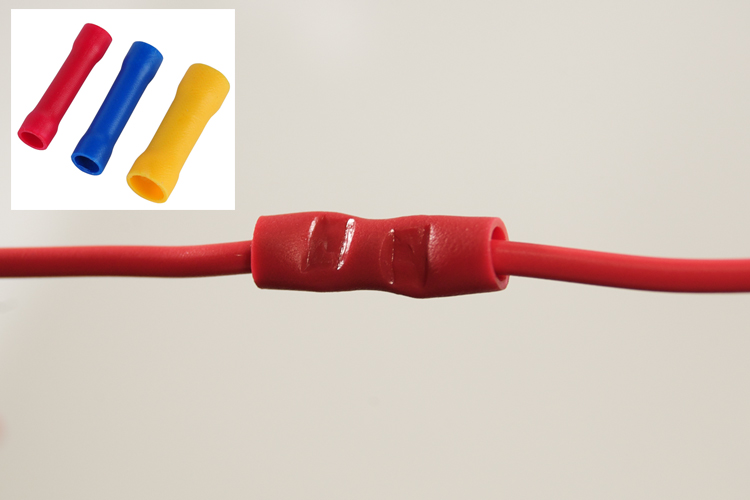
-scotchlok splices like this

-or soldering
You can cut genuine TPS connector from vehicle’s wiring and install new one included in kit. And from other new one and old genuine connector you can make an adapter for genuine TPS and with this solution you can connect both TPSs to vehicle wiring as you wish and as you need.
From what point it will be better to take supply voltage12V?
The 12V power supply should appear when the ignition key is turned on, and disappear when turned off. Under the hood you can take it from supply wire of the ignition coil. If something unclear or you don’t have schematics- please write to me and I’ll help you.
Calibration and configuration of the sensor via the application
When using the Bluetooth module and the app, calibration must be performed with the throttle fully open. Therefore, before starting the calibration, make sure that the throttle pedal cable is properly tensioned and the throttle is fully open when the pedal is pressed to the floor. Otherwise, the calibration will be incorrect and you will not get normal engine operation. If you are not sure that the throttle cable is properly tightened and there is no partner around, open the throttle manually by the lever all the way to the stop, start calibration, and wait till it ends.
- Install the bluetooth module into the connector on the sensor.
Orient on the GND pin – these pins must match on both the module and the sensor.
The RX-TX pins will be cross-connected.
To avoid losing the module during test drives, use a piece of twine, one end of which should be tied to some tube or bracket, and the other end to the Bluetooth module. - Add the Bluetooth module to the device list.
When searching, you will see two devices BLE-33 and SPP-33.
Only SPP-33 (password 1234) should be added.
Do not add BLE-33! And if you have added it before – remove it from the list of devices, otherwise there will be no connection. - Turn on the ignition, start the application, give all the permissions requested by the program and then click twice on the bluetooth icon and wait for the program to connect to the sensor.
- Click on the sensor image and the calibration menu will appear.
In the calibration menu select calibration with the throttle fully open.
Open the throttle all the way, press the calibration button and wait for the calibration to complete.
- When the calibration is complete, select the “New Standard” settings from the list and write them to memory.

- Start the dashboard and by changing the alpha angle, set the sensor is to exactly 88 degrees with the throttle fully open. After that stop the instrument panel and record the alpha angle position in the memory.

- Then it is necessary to make a test drive and see how everything works.
Then reduce the alpha angle by 0.5 degrees (at fully open throttle the sensor angle will be 87.5 degrees), save in memory and make another test drive.
Then similarly increase the alpha angle by 0.5 degrees from the original, so that at fully open throttle the angle was 88.5 degrees and also make a test drive.
Based on the results of the tests, we decide where to turn the sensor further.
If the thrust is reduced, we turn the angle down in steps of 0.5 degrees.
If, on the contrary, detonation or vibration is observed and there is no elasticity when shifting gears, we turn the alpha towards increasing the angle. - Thus, for several trips you need to test the angles in the range of +/-2 degrees from the initial (88 degrees) with a step of 0.5 degrees.
After you have found the optimal one, from it you test the angles in both directions (within +/-0.5 degrees) in 0.2 degree increments. - At the last step you need to test values +/- 0.1 degrees from the angle obtained in the previous step.
After that the adjustment can be considered as completed. Do not forget to save the alpha angle in the memory before turning off the ignition (if you have changed this angle).
Vehicles with automatic transmission – AT output settings
On VAG you will need to use a vagcom to relearn AT ECU for new TPS in basic settings mode.
In case of inadequate gear shifting on standard settings,
please send a request with a detailed description of the problem to our email to get access to advanced AT output settings. After that I will give you access to individual AT output settings.
Instructions Archive
Attention!!!
Installation manual below is for software and firmware versions V1.5 and lower.
For versions 1.6 , 1.7 and newer boards manufactured after 08.04.2024 look at the corresponding tab for new manual and firmware. For vesions 1.5 and 1.6 it also recommended to make a firmware update and use new instructions.
Installation Manual for sensors manufactured before 08.04.2024
Installation of the new TPS on the throttle body
Here is a simplified video tutorial about installation of this sensor
Pinout of TPS and wires connection
Here is a pinout :
1– Output signal as track #1 on genuine TPS
2– Output signal as track #2 on genuine TPS
AT-Output signal for automatic transaxle ECU
O2/REF – Input signal of reference voltage 5V or oxygen sensor signal ( for test )
GND – ground
12V – supply voltage
Ok. Now lets look at the connection diagrams
On the schematic above you can see TPS with blue wago type connector, dont worry about it – it was on previous version. But for clear connection view this picture will be the best, because pinout is same .
Ok . Depending on transaxle type , there culd be two differet TPS connectors and corresponding connection diagrams( see pic above).
To find numeration of pins of genuine connector all you need is to turn inginion on and find reference voltage(5v) with a multimeter.
Nothing difficult.
If you have questions – feel free to ask in discussion tab.
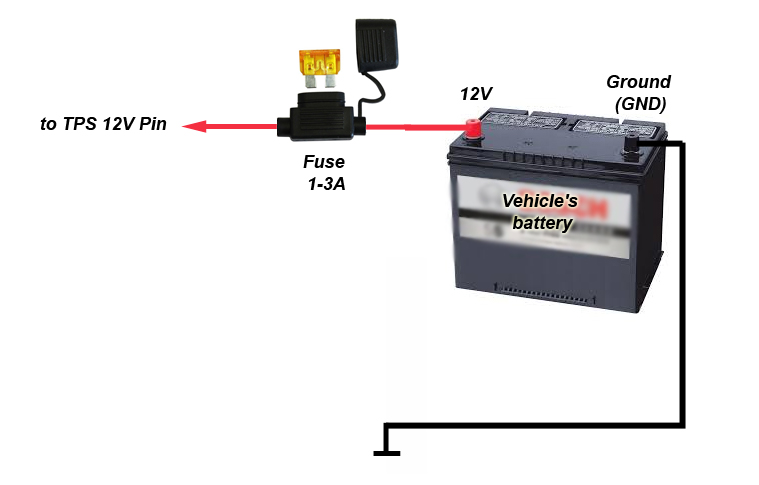
For supply voltage we need additional wire 12V .
As 12V not presents on genuine connector, we can take it directly form battery’s positive terminal via fuse 1-3A ( not included in kit – you can buy it at any local autoparts store). The fuse should be installed as close as possible to the battery to protect TPS’s supply line properly.
To connect new connector to vehicle wiring you can use:
-Butt connecor like this
-scotchlok splices like this
-or soldering
You can cut genuine TPS connector from vehicle’s wiring and install new one included in kit. And from other new one and old genuine connector you can make an adapter for genuine TPS and with this solution you can connect both TPSs to vehicle wiring as you wish and as you need.
How to install a bluetooth module in the socket of the sensor
During installtion please check marking on bluetooth and tps:
5v-5v, gnd-gnd, rx-tx,tx-rx
You can download it from this link
Precision Tuning
Also you can very precisely tune the TPS and it will work exactly as the manufacturer of your car conceived.
Before you will make this , you should check:
1. Oxygen sensor. It must be 100% working.
2. Rubber mounting of the throttle body. It must be not damaged and there must be no vacuum leaks.
3. Intake air warmup system should be working and intake air temperature should be in a range of 30-40 Celsius degrees
If all above checked and works perfectly, run VAG COM , VAG Tool or Monoscan software, reset adaptations of ECU ( on some models you need just disconnect battery terminal for a couple minutes).
Now start engine and drive your vehicle for a couple kilometers and check mixture correction( or Long term fuel trim).
Mixture correction should be +/-8% in ideal. If it is out of range, then virtualy rotate the TPS to enrich or enlean a mixture (0.5-1 degrees is enough and don’t forget to store virtual angle to EEPROM of TPS), drive a couple of kilometers and check again -make corrections if needed while mixture correction not achieve +/-8% range.
Also you can make this tuning at stopped vehicle at 3000 rpm, but in this case you will need to wait at this RPM (3-5 min) while ECU learns a new mixture correction.
Thats all! Enjoy how it works 🙂
p.s. After all tunings done it will be good to remove bluetooth module and apply an automotive sealant on the connector to protect it from moisture.
Technical Characteristics
Anton’s TPS has an onboard protection from reverse polarity and overvoltage
Supply voltage 6-16V
Operating temterature range -40 to +110 С
Neodum Magnet H class (operating temperature up to +120С)
Autotunig and firmware update functions provides you simple installation, tuning and upgrade is nessesary
The PCB of our converter is varnished to protect it from moisture and reagents
FAQ
1. Why there is a difference in the diameter of available bushing with magnet , and which one should i order?
It is very simple – it depends on engine’s volume , because there installed different throttle bodies.
Engines with displacement 1.8 and 2.0 liters has throttle body with a throttle spindle diameter 5mm:
And engines with displacement 1.4 and 1.6 liters has throttle body with a throttle spindle diameter 8mm:

To make right choice you need to know your engine displacement, or remove genuine TPS and check throttle spindle diameter 🙂
2. What if spindle brushing is totally damaged? As your TPS is contactless, I wonder whether it was functioning to my damaged spindle.
In this case our TPS will perfectly works. See pictures above with damaged brushing – now it is not a problem at all.
3.Where can I download a tuning software?
The newest version of tuning software and firmware availbale at “Complete installation manual” tab
Got something to discuss?
would it work with 1.3 liter polo AAV … I have hughe issues with those injection units.
Hallo,
kann ich bei Ihnen aus Deutschland bestellen?
Kann ich Paypal bezahlen?
Est-il compatible pour clip 1 de 1995
Fonctionne t’il pour Renault clio 1
1995 .
Hello. Theoretically – yes. The sensor is universal. In new firmware it is possible to adjust each track output separately.
Send me a picture of your TPS.
Hi
Will it fit a 954cm3 peugeot tu9m from 1997?
Hi. Possibly yes – please send me a picture of genuine TPS
Hi,
I have a fiat uno using this tps sensor but im not sure that my sensor is the one with 5mm axis.
I sent you an email with pics in the past but no reply.
Hi, Please open FAQ tab and compare with your photos – it is 8mm.
p.s. I was out of country and couldn’t answer .
Hi Anton! I have an old Fiat Bravo I 1.4 with regular TPS problems. My qeustion is that your contactless product could be compatible with it? It has an older 4 pin TPS wich has a 5 V supply voltage from the ECU, not 12 V as the newer ones. Does your product work with 5 V supply power?
Hello, The sensor is universal. For manual transmission you dont need to connect AT output of the sensor.
5 v is not a supply voltage!- it is reference.
For supply of the sensor need additional separate wire – you need to make it by your own.
To understand how all works look at manual tab and connection diagrams.
I have a PSA engine (KDY – TU3M) at a Peugeot 106 (11/1992). The management system is a BOSCH MONO JETRONIC A2.2
As the tps are in poor condition i decided to change the factory pts with yours contact less product, but first I have something to ask:
1. The file brokentps.com/Pilot3437022_beta3.rar does not open at win10 or android with winrar or iso or breezip. It is also not in the Google play store for installation on Android.
2. Will the proposed setup in your video with contact less TPS, the idle motor will be able to work properly, even if the throttle stop bolt has been setup in the past? Do you have anything extra to suggest as a setting in this case?
4. Is there any more availability of a contact less TPS?
Thank’s
Answered on your email 🙂
2. I don’t no why i must have at pins 1 & 2 about 0.19mV (0.17 – 0.20mV & not 0.17V as usual) for about 700mV from λ. for work properly with my bad PSA official TPS??? [ From 15:55 https://www.youtube.com/watch?v=VGjnE8l490w ]
Any value ok , the only one thing which matters- λ voltage when you setting the TPS on working engine.
Also before you beging precise tuning λ must be disconnected from ecu and battery must be disconneced for 30-60 second with a pressed brajke pedal ( bulbs discharges ecu circuits) to reset mixture adaptations.
Thank you. I wish you all the best.
Is it compatible with Renault 19 E7j
I don’t know , just look at the sensor on your throttle body or send a pic here
I want one for my jetta mk3 tbi
Hello Dear Developer,
I would like to order one for my Audi 80 1.8S engine code: PM. I have Samsung S7 Edge. Is this android application still works ? I want to fine tune my carburetor and this seems to be a perfect solution. Please let me know so I can put an order and try your invention 🙂
Thx in advance !
We are not tested it on Smsung s7 edge and at this moment we are rebuilding android software.
But if it will not work on your smartphone, you can use windows version – it is tested and stable.
Also the softwre works only with our contactless sensor and it compatible with mono motronic and mono jetronic fuel injection systems.
It is not comp[atible with carburators like solex or pierburg etc.
Buongiorno…sono un meccanico in Italia dovrei riparare una fiat panda 4×4 1100..con iniezione Bosch potenziometro con 4 PIN diametro boccola 5mm e compatibile anche per questa vettura?
Hello.
Yes – it is compatible with fiat panda.
But before will make an order you need to romove genuine TPS and check axis end diameter. Some models has 5mm axis end, other 8mm.
Google translate:
Ciao. Sì, è compatibile con fiat panda. Ma prima di effettuare un ordine è necessario rimuovere il TPS originale e controllare il diametro dell’estremità dell’asse. Alcuni modelli hanno assi da 5 mm e altri da 8 mm.
Hi, I’ve got a Polo 86C with AAV motor and monomotronic injection. Can I install your parts on my car? On the potentiometer I’ve four wires and not seven, is there a way to adapt it?
Best regards
Hi.
This sensor can replace both 4 wires and 7 wires sensors.
Check the part # of your sensor or make a photo and send it to my email.
Hello, I live in France and I would like to buy you a kit to replace the butterfly potentiometer for my 205 1.4.
I have read your page on how to pay but I have none of that, is it possible to pay by paypal?
Thank you
Hello.
Sorry for delay with answer.
Several days ago our post office approved shipping to EU, so you can make an order.
PayPal is not available in our country and we ca accept only Moneygram and Worldremit
Hello, did you teceived my question below? I need to buy this contactless position sensor for my Citroen ZX 1994 but my engine is 1.4 and the axis is only 5 mm; will it fit my car? Best regards
Hello.
Sorry for delay with answer.
I checked your car in autodata database. And it seems that there is a bosch monomotronic injection system.
This sensor will perfectly work on this system.
I am wondered a little bit about an axis diameter. Because on VW, Audi and Peugeot there is a 8mm axis on 1.4-1.6l engines.
The outut characteristics of the sensor on all engines is the same. So you need only to choose right bushing.
If you meaured throttle’s end diameter 5mm, then choose 5mm bushing. Or i can put both in the package.
Also remember that this sensor supports dataloging and firmware update, so we can remotle create any output characteristics.
Within several days i will post an update here , becausde we made new tuning software for this sensor for Android and Win platforms.
If you have any additional questions – feel free to ask.
Best Regrads
Anton
Hello, I need to order a contactless position sensor for a Citroen ZX Avantage 1994 engine 1.4. The actual sensor is 3 437 022 511 with 5 mm axis and on your option 5 mm axis is for 1.8 or 2L engines: what can I do? or what should I order? Best regards.
Hello Julio, How are you ?
How the sensor works on your vehicle ?